


RF-DETR is a real-time, transformer-based object detection model architecture developed by Roboflow and released under the Apache 2.0 license.
RF-DETR is the first real-time model to exceed 60 AP on the Microsoft COCO benchmark alongside competitive performance at base sizes. It also achieves state-of-the-art performance on RF100-VL, an object detection benchmark that measures model domain adaptability to real world problems. RF-DETR is comparable speed to current real-time objection models.
RF-DETR is small enough to run on the edge, making it an ideal model for deployments that need both strong accuracy and real-time performance.
We validated the performance of RF-DETR on both Microsoft COCO and the RF100-VL benchmarks.

RF100-VL benchmark results

| Model | params (M) |
mAPCOCO val @0.50:0.95 |
mAPRF100-VL Average @0.50 |
mAPRF100-VL Average @0.50:95 |
Total Latency T4 bs=1 (ms) |
|---|---|---|---|---|---|
| D-FINE-M | 19.3 | 55.1 | N/A | N/A | 6.3 |
| LW-DETR-M | 28.2 | 52.5 | 84.0 | 57.5 | 6.0 |
| YOLO11m | 20.0 | 51.5 | 84.9 | 59.7 | 5.7 |
| YOLOv8m | 28.9 | 50.6 | 85.0 | 59.8 | 6.3 |
| RF-DETR-B | 29.0 | 53.3 | 86.7 | 60.3 | 6.0 |
RF100-VL benchmark notes
-
The "Total Latency" reported here is measured on a T4 GPU using TensorRT10 FP16 (ms/img) and was introduced by LW-DETR. Unlike transformer-based models, YOLO models perform Non-Maximum Suppression (NMS) after generating predictions to refine bounding box candidates. While NMS boosts accuracy, it also slightly reduces speed due to the additional computation required, which varies with the number of objects in an image. Notably, many YOLO benchmarks include NMS in accuracy measurements but exclude it from speed metrics. By contrast, our benchmarking—following LW-DETR’s approach—factors in NMS latency to provide a uniform measure of the total time needed to obtain a final result across all models on the same hardware.
-
D-FINE’s fine-tuning capability is currently unavailable, making its domain adaptability performance inaccessible. The authors caution that “if your categories are very simple, it might lead to overfitting and suboptimal performance.” Furthermore, several open issues (#108, #146, #169, #214) currently prevent successful fine-tuning. We have opened an additional issue in hopes of ultimately benchmarking D-FINE with RF100-VL.
2025/03/20: We release RF-DETR real-time object detection model. Code and checkpoint for RF-DETR-large and RF-DETR-base are available.2025/04/03: We release early stopping, gradient checkpointing, metrics saving, training resume, TensorBoard and W&B logging support.
Pip install the rfdetr package in a Python>=3.9 environment.
pip install rfdetrInstall from source
By installing RF-DETR from source, you can explore the most recent features and enhancements that have not yet been officially released. Please note that these updates are still in development and may not be as stable as the latest published release.
pip install git+https://github.com/roboflow/rf-detr.gitThe .predict() method accepts various input formats, including file paths, PIL images, NumPy arrays, and torch tensors. Please ensure inputs use RGB channel order. For torch.Tensor inputs specifically, they must have a shape of (3, H, W) with values normalized to the [0..1) range.
import io
import requests
import supervision as sv
from PIL import Image
from rfdetr import RFDETRBase
from rfdetr.util.coco_classes import COCO_CLASSES

model = RFDETRBase()

url = "https://media.roboflow.com/notebooks/examples/dog-2.jpeg"

image = Image.open(io.BytesIO(requests.get(url).content))
detections = model.predict(image, threshold=0.5)

labels = [
    f"{COCO_CLASSES[class_id]} {confidence:.2f}"
    for class_id, confidence
    in zip(detections.class_id, detections.confidence)
]

annotated_image = image.copy()
annotated_image = sv.BoxAnnotator().annotate(annotated_image, detections)
annotated_image = sv.LabelAnnotator().annotate(annotated_image, detections, labels)

sv.plot_image(annotated_image)
Video inference
import supervision as sv
from rfdetr import RFDETRBase
from rfdetr.util.coco_classes import COCO_CLASSES

model = RFDETRBase()

def callback(frame, index):
    detections = model.predict(frame[:, :, ::-1], threshold=0.5)

    labels = [
        f"{COCO_CLASSES[class_id]} {confidence:.2f}"
        for class_id, confidence
        in zip(detections.class_id, detections.confidence)
    ]

    annotated_frame = frame.copy()
    annotated_frame = sv.BoxAnnotator().annotate(annotated_frame, detections)
    annotated_frame = sv.LabelAnnotator().annotate(annotated_frame, detections, labels)
    return annotated_frame

sv.process_video(
    source_path=<SOURCE_VIDEO_PATH>,
    target_path=<TARGET_VIDEO_PATH>,
    callback=callback
)
Webcam inference
import cv2
import supervision as sv
from rfdetr import RFDETRBase
from rfdetr.util.coco_classes import COCO_CLASSES

model = RFDETRBase()

cap = cv2.VideoCapture(0)
while True:
    success, frame = cap.read()
    if not success:
        break

    detections = model.predict(frame[:, :, ::-1], threshold=0.5)

    labels = [
        f"{COCO_CLASSES[class_id]} {confidence:.2f}"
        for class_id, confidence
        in zip(detections.class_id, detections.confidence)
    ]

    annotated_frame = frame.copy()
    annotated_frame = sv.BoxAnnotator().annotate(annotated_frame, detections)
    annotated_frame = sv.LabelAnnotator().annotate(annotated_frame, detections, labels)

    cv2.imshow("Webcam", annotated_frame)

    if cv2.waitKey(1) & 0xFF == ord('q'):
        break

cap.release()
cv2.destroyAllWindows()
RTSP stream inference
import cv2
import supervision as sv
from rfdetr import RFDETRBase
from rfdetr.util.coco_classes import COCO_CLASSES

model = RFDETRBase()

cap = cv2.VideoCapture(<RTSP_STREAM_URL>)
while True:
    success, frame = cap.read()
    if not success:
        break

    detections = model.predict(frame[:, :, ::-1], threshold=0.5)

    labels = [
        f"{COCO_CLASSES[class_id]} {confidence:.2f}"
        for class_id, confidence
        in zip(detections.class_id, detections.confidence)
    ]

    annotated_frame = frame.copy()
    annotated_frame = sv.BoxAnnotator().annotate(annotated_frame, detections)
    annotated_frame = sv.LabelAnnotator().annotate(annotated_frame, detections, labels)

    cv2.imshow("RTSP Stream", annotated_frame)

    if cv2.waitKey(1) & 0xFF == ord('q'):
        break

cap.release()
cv2.destroyAllWindows()Important
Batch inference isn’t officially released yet.
Install from source to access it: pip install git+https://github.com/roboflow/rf-detr.git.
You can provide .predict() with either a single image or a list of images. When multiple images are supplied, they are processed together in a single forward pass, resulting in a corresponding list of detections.
import io
import requests
import supervision as sv
from PIL import Image
from rfdetr import RFDETRBase
from rfdetr.util.coco_classes import COCO_CLASSES

model = RFDETRBase()

urls = [
    "https://media.roboflow.com/notebooks/examples/dog-2.jpeg",
    "https://media.roboflow.com/notebooks/examples/dog-3.jpeg"
]

images = [Image.open(io.BytesIO(requests.get(url).content)) for url in urls]

detections_list = model.predict(images, threshold=0.5)

for image, detections in zip(images, detections_list):
    labels = [
        f"{COCO_CLASSES[class_id]} {confidence:.2f}"
        for class_id, confidence
        in zip(detections.class_id, detections.confidence)
    ]

    annotated_image = image.copy()
    annotated_image = sv.BoxAnnotator().annotate(annotated_image, detections)
    annotated_image = sv.LabelAnnotator().annotate(annotated_image, detections, labels)

    sv.plot_image(annotated_image)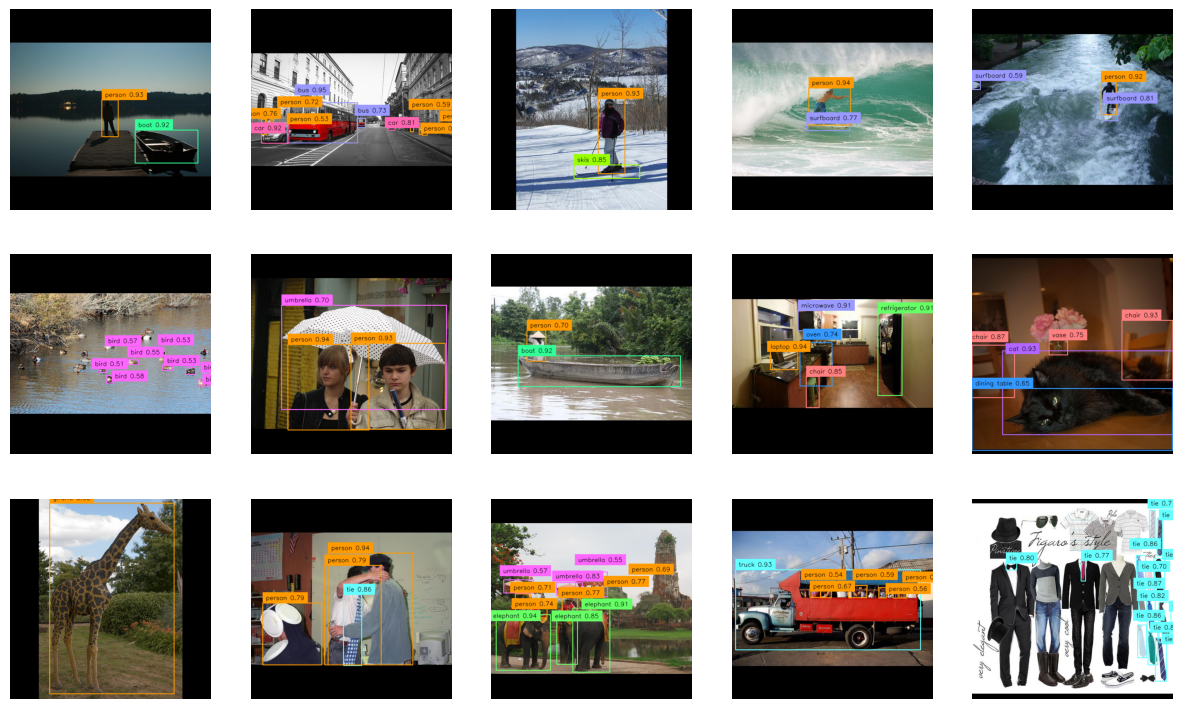
RF-DETR is available in two variants: RF-DETR-B 29M RFDETRBase and RF-DETR-L 128M RFDETRLarge. The corresponding COCO pretrained checkpoints are automatically loaded when you initialize either class.
Both model variants support configurable input resolutions. A higher resolution usually improves prediction quality by capturing more detail, though it can slow down inference. You can adjust the resolution by passing the resolution argument when initializing the model. resolution value must be divisible by 56.
model = RFDETRBase(resolution=560)RF-DETR expects the dataset to be in COCO format. Divide your dataset into three subdirectories: train, valid, and test. Each subdirectory should contain its own _annotations.coco.json file that holds the annotations for that particular split, along with the corresponding image files. Below is an example of the directory structure:
dataset/
├── train/
│   ├── _annotations.coco.json
│   ├── image1.jpg
│   ├── image2.jpg
│   └── ... (other image files)
├── valid/
│   ├── _annotations.coco.json
│   ├── image1.jpg
│   ├── image2.jpg
│   └── ... (other image files)
└── test/
    ├── _annotations.coco.json
    ├── image1.jpg
    ├── image2.jpg
    └── ... (other image files)
Roboflow allows you to create object detection datasets from scratch or convert existing datasets from formats like YOLO, and then export them in COCO JSON format for training. You can also explore Roboflow Universe to find pre-labeled datasets for a range of use cases.
You can fine-tune RF-DETR from pre-trained COCO checkpoints. By default, the RF-DETR-B checkpoint will be used. To get started quickly, please refer to our fine-tuning Google Colab notebook.
from rfdetr import RFDETRBase

model = RFDETRBase()

model.train(dataset_dir=<DATASET_PATH>, epochs=10, batch_size=4, grad_accum_steps=4, lr=1e-4, output_dir=<OUTPUT_PATH>)
Different GPUs have different VRAM capacities, so adjust batch_size and grad_accum_steps to maintain a total batch size of 16. For example, on a powerful GPU like the A100, use batch_size=16 and grad_accum_steps=1; on smaller GPUs like the T4, use batch_size=4 and grad_accum_steps=4. This gradient accumulation strategy helps train effectively even with limited memory.
More parameters
| Parameter | Description |
|---|---|
dataset_dir |
Specifies the COCO-formatted dataset location with train, valid, and test folders, each containing _annotations.coco.json. Ensures the model can properly read and parse data. |
output_dir |
Directory where training artifacts (checkpoints, logs, etc.) are saved. Important for experiment tracking and resuming training. |
epochs |
Number of full passes over the dataset. Increasing this can improve performance but extends total training time. |
batch_size |
Number of samples processed per iteration. Higher values require more GPU memory but can speed up training. Must be balanced with grad_accum_steps to maintain the intended total batch size. |
grad_accum_steps |
Accumulates gradients over multiple mini-batches, effectively raising the total batch size without requiring as much memory at once. Helps train on smaller GPUs at the cost of slightly more time per update. |
lr |
Learning rate for most parts of the model. Influences how quickly or cautiously the model adjusts its parameters. |
lr_encoder |
Learning rate specifically for the encoder portion of the model. Useful for fine-tuning encoder layers at a different pace. |
resolution |
Sets the input image dimensions. Higher values can improve accuracy but require more memory and can slow training. Must be divisible by 56. |
weight_decay |
Coefficient for L2 regularization. Helps prevent overfitting by penalizing large weights, often improving generalization. |
device |
Specifies the hardware (e.g., cpu or cuda) to run training on. GPU significantly speeds up training. |
use_ema |
Enables Exponential Moving Average of weights, producing a smoothed checkpoint. Often improves final performance with slight overhead. |
gradient_checkpointing |
Re-computes parts of the forward pass during backpropagation to reduce memory usage. Lowers memory needs but increases training time. |
checkpoint_interval |
Frequency (in epochs) at which model checkpoints are saved. More frequent saves provide better coverage but consume more storage. |
resume |
Path to a saved checkpoint for continuing training. Restores both model weights and optimizer state. |
tensorboard |
Enables logging of training metrics to TensorBoard for monitoring progress and performance. |
wandb |
Activates logging to Weights & Biases, facilitating cloud-based experiment tracking and visualization. |
project |
Project name for Weights & Biases logging. Groups multiple runs under a single heading. |
run |
Run name for Weights & Biases logging, helping differentiate individual training sessions within a project. |
early_stopping |
Enables an early stopping callback that monitors mAP improvements to decide if training should be stopped. Helps avoid needless epochs when mAP plateaus. |
early_stopping_patience |
Number of consecutive epochs without mAP improvement before stopping. Prevents wasting resources on minimal gains. |
early_stopping_min_delta |
Minimum change in mAP to qualify as an improvement. Ensures that trivial gains don’t reset the early stopping counter. |
early_stopping_use_ema |
Whether to track improvements using the EMA version of the model. Uses EMA metrics if available, otherwise falls back to regular mAP. |
You can resume training from a previously saved checkpoint by passing the path to the checkpoint.pth file using the resume argument. This is useful when training is interrupted or you want to continue fine-tuning an already partially trained model. The training loop will automatically load the weights and optimizer state from the provided checkpoint file.
from rfdetr import RFDETRBase

model = RFDETRBase()

model.train(dataset_dir=<DATASET_PATH>, epochs=10, batch_size=4, grad_accum_steps=4, lr=1e-4, output_dir=<OUTPUT_PATH>, resume=<CHECKPOINT_PATH>)
Early stopping monitors validation mAP and halts training if improvements remain below a threshold for a set number of epochs. This can reduce wasted computation once the model converges. Additional parameters—such as early_stopping_patience, early_stopping_min_delta, and early_stopping_use_ema—let you fine-tune the stopping behavior.
from rfdetr import RFDETRBase

model = RFDETRBase()

model.train(dataset_dir=<DATASET_PATH>, epochs=10, batch_size=4, grad_accum_steps=4, lr=1e-4, output_dir=<OUTPUT_PATH>, early_stopping=True)You can fine-tune RF-DETR on multiple GPUs using PyTorch’s Distributed Data Parallel (DDP). Create a main.py script that initializes your model and calls .train() as usual than run it in terminal.
python -m torch.distributed.launch --nproc_per_node=8 --use_env main.pyReplace 8 in the --nproc_per_node argument with the number of GPUs you want to use. This approach creates one training process per GPU and splits the workload automatically. Note that your effective batch size is multiplied by the number of GPUs, so you may need to adjust your batch_size and grad_accum_steps to maintain the same overall batch size.
During training, two model checkpoints (the regular weights and an EMA-based set of weights) will be saved in the specified output directory. The EMA (Exponential Moving Average) file is a smoothed version of the model’s weights over time, often yielding better stability and generalization.
TensorBoard is a powerful toolkit that helps you visualize and track training metrics. With TensorBoard set up, you can train your model and keep an eye on the logs to monitor performance, compare experiments, and optimize model training. To enable logging, simply pass tensorboard=True when training the model.
Using TensorBoard with RF-DETR
-
TensorBoard logging requires additional packages. Install them with:
pip install "rfdetr[metrics]" -
To activate logging, pass the extra parameter
tensorboard=Trueto.train():from rfdetr import RFDETRBase model = RFDETRBase() model.train( dataset_dir=<DATASET_PATH>, epochs=10, batch_size=4, grad_accum_steps=4, lr=1e-4, output_dir=<OUTPUT_PATH>, tensorboard=True )
-
To use TensorBoard locally, navigate to your project directory and run:
tensorboard --logdir <OUTPUT_DIR>
Then open
http://localhost:6006/in your browser to view your logs. -
To use TensorBoard in Google Colab run:
%load_ext tensorboard
%tensorboard --logdir <OUTPUT_DIR>
Weights and Biases (W&B) is a powerful cloud-based platform that helps you visualize and track training metrics. With W&B set up, you can monitor performance, compare experiments, and optimize model training using its rich feature set. To enable logging, simply pass wandb=True when training the model.
Using Weights and Biases with RF-DETR
-
Weights and Biases logging requires additional packages. Install them with:
pip install "rfdetr[metrics]" -
Before using W&B, make sure you are logged in:
wandb login
You can retrieve your API key at wandb.ai/authorize.
-
To activate logging, pass the extra parameter
wandb=Trueto.train():from rfdetr import RFDETRBase model = RFDETRBase() model.train( dataset_dir=<DATASET_PATH>, epochs=10, batch_size=4, grad_accum_steps=4, lr=1e-4, output_dir=<OUTPUT_PATH>, wandb=True, project=<PROJECT_NAME>, run=<RUN_NAME> )
In W&B, projects are collections of related machine learning experiments, and runs are individual sessions where training or evaluation happens. If you don't specify a name for a run, W&B will assign a random one automatically.
from rfdetr import RFDETRBase

model = RFDETRBase(pretrain_weights=<CHECKPOINT_PATH>)

detections = model.predict(<IMAGE_PATH>)Important
Starting with RF-DETR 1.2.0, you'll have to run pip install rfdetr[onnxexport] before exporting model weights to ONNX format.
RF-DETR supports exporting models to the ONNX format, which enables interoperability with various inference frameworks and can improve deployment efficiency. To export your model, simply initialize it and call the .export() method.
from rfdetr import RFDETRBase

model = RFDETRBase(pretrain_weights=<CHECKPOINT_PATH>)

model.export()
This command saves the ONNX model to the output directory.
Both the code and the weights pretrained on the COCO dataset are released under the Apache 2.0 license.
Our work is built upon LW-DETR, DINOv2, and Deformable DETR. Thanks to their authors for their excellent work!
If you find our work helpful for your research, please consider citing the following BibTeX entry.
@software{rf-detr,
  author = {Robinson, Isaac and Robicheaux, Peter and Popov, Matvei},
  license = {Apache-2.0},
  title = {RF-DETR},
  howpublished = {\url{https://github.com/roboflow/rf-detr}},
  year = {2025},
  note = {SOTA Real-Time Object Detection Model}
}We welcome and appreciate all contributions! If you notice any issues or bugs, have questions, or would like to suggest new features, please open an issue or pull request. By sharing your ideas and improvements, you help make RF-DETR better for everyone.